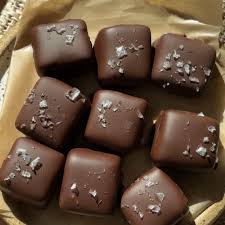
Indulge in Homemade Chocolate-Dipped Caramels: A Guilt-Free Delight
Who doesn’t love the sweet, buttery taste of caramel? Paired with the rich, deep flavor of dark chocolate, it’s a match made in heaven. However, traditional caramel is often loaded with sugar, which can be a concern for those watching their sugar intake. That’s why I’m excited to share this healthier twist on a classic favorite—Chocolate-Dipped Caramels made with a Lakanto sugar substitute and other wholesome ingredients.
Why This Recipe is Perfect for You
This recipe is designed for anyone looking to indulge in a sweet treat without the guilt. Whether you’re following a low-sugar diet, vegan lifestyle, or simply want to try something new, these caramels are sure to satisfy your sweet tooth. Made with coconut cream, coconut oil, and a touch of peanut butter, they offer a rich, creamy texture that rivals any traditional caramel. Plus, dipping them in unsweetened chocolate balances the sweetness perfectly, creating a decadent treat that’s both delicious and diet-friendly.
Indulge in Homemade Chocolate-Dipped Caramels: A Guilt-Free Delight
Course: Dessert4
servings30
minutes40
minutes300
kcalIngredients
Directions
Kitchen Equipment Needed
- Heavy-bottomed saucepan
- Square baking dish
- Parchment paper
- Microwave-safe bowl
- Fork or dipping tool
- Cutting board
- Sharp knife
Tips and Variations
Tips:
- Stir Constantly: To prevent the caramel from burning, make sure to stir continuously, especially once it starts boiling.
- Check Consistency: The caramel should be thick but pourable when you remove it from the heat. If it’s too thick, you may need to adjust the cooking time slightly.
- Use a Candy Thermometer: For precise results, consider using a candy thermometer to ensure the caramel reaches the perfect temperature.
Variations:
- Nut-Free Option: If you’re allergic to nuts, use a seed butter like sunflower seed butter instead of peanut butter.
- Flavor Twists: Add a pinch of cinnamon or a drop of almond extract for a unique flavor variation.
- Chocolate Alternatives: If unsweetened chocolate is too bitter for your taste, try a dark chocolate with a higher cocoa content, such as 85%.
How to Store Leftovers
These chocolate-dipped caramels can be stored in an airtight container in the refrigerator for up to two weeks. For longer storage, you can freeze them for up to three months. Just be sure to separate layers with parchment paper to prevent sticking.
Food and Drink Pairings
These caramels pair wonderfully with a cup of hot coffee or tea. For an extra indulgent treat, enjoy them with a glass of red wine. The rich flavors of the caramel and chocolate complement the wine beautifully, making for a perfect after-dinner dessert.
FAQ
Q: Can I use regular sugar instead of a sugar substitute?
A: Yes, you can use regular sugar if you prefer. Just keep in mind that the nutritional content will change.
Q: How do I make the caramel vegan?
A: Ensure all your ingredients, especially the coconut cream and oil, are vegan. You can also use vegan butter instead of coconut oil.
Q: What if my caramel is too hard or too soft?
A: If your caramel is too hard, it may have cooked for too long. If it’s too soft, it might need to cook a bit longer. Adjust the cooking time as needed.
Q: Can I use other types of nut butters?
A: Absolutely! Almond butter, cashew butter, or even tahini can be used for different flavor profiles.
Call to Action
I hope you enjoy making and indulging in these delicious Chocolate-Dipped Caramels as much as I do. If you try this recipe, please share your results in the comments below. Don’t forget to subscribe to my blog for more delightful recipes and cooking tips. Happy cooking!
Enjoy the sweet, satisfying taste of homemade caramels, and share the joy with your friends and family. Your taste buds—and your loved ones—will thank you!